Main FAQ »
Artist FAQ » Upload Guide
Getting started
To access the upload system, log-in or register and choose Upload Images under My Account. This will display the My Upload Folder page.
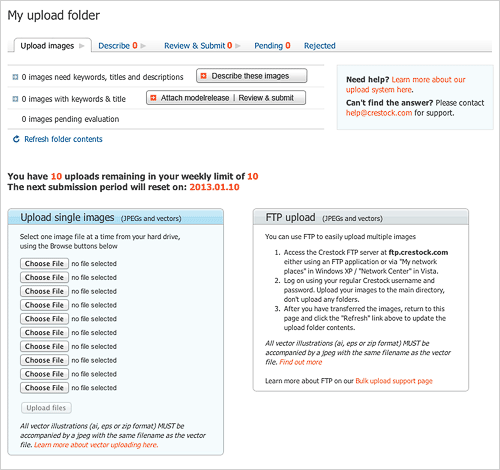
To upload individual photos or vectors, use the single image upload form on this page. You can select up to ten images at a time individually by using the Choose File buttons. Alternately, you can opt to transfer batches of images via FTP. (Get more information on FTP uploading here.)
- If you have already uploaded your images via FTP to ftp.crestock.com, My upload folder shows you how many files are ready to be processed.
- If you opt to upload images individually, after you have selected images with Choose File, click Upload files.
After files have uploaded, you can choose to either add more files (up to the weekly limit) or commence processing.

Click Process new files when ready. Your images will now be queued for processing into the system.
Processing will run in the background and may take some time. You will receive an automated email notification with a summary of the results once processing is complete. Please ensure that the email address in your account is correct. (If you do not receive the email within an hour, please check your junk or spam folders for a message titled “Image scanning complete” from images@crestock.com. It may be necessary to add this address to your safe senders list.)
Tip: We operate an upload quota system which limits your initial upload quota to 10 images per week. The weekly upload limit will depend on your approval rate. To most quickly expand this upload limit, we recommend selectively submitting your strongest images and avoiding submission of too many duplicates or similar files.
Describing images
After processing is complete, if your images contain sufficient embedded metadata (title, description and at least 10 keywords), they will appear on the Review & Submit tab.
If your images do not have titles, descriptions and keywords embedded as metadata, they will be processed and added to the Describe tab, where you can add the necessary information in American English. (Images with partial metadata will also be displayed under the Describe tab, where you can click Edit below each image to complete the fields or information needed.)
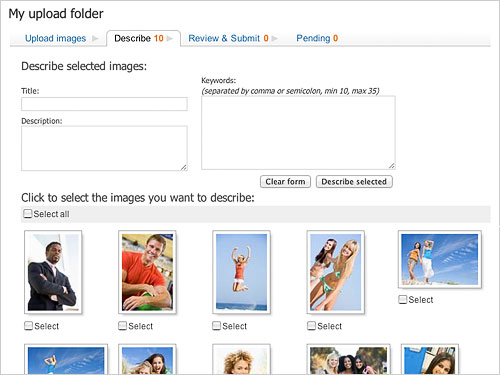
To describe an image, on the Describe page, place a check under any image(s) that you wish to update.
Enter information about the image in the Title, Description, and Keyword fields.
Once ready, click the Describe Selected button found directly below the Keyword field. This will attach the information you entered to the image(s).
Important: do not click Review & Submit at this stage, or all the information you entered will be lost.
If sufficient information has been added, the page will refresh and the image will move to Review & Submit automatically. These steps can then be repeated for other images with different title/description/keyword information. (Place a check below all images that you wish to have the same information.)
The form fields will retain the information you typed until you click Clear form to enter different information, or navigate away from the page.
Attaching Model releases
If you are uploading for the first time, or you use a new model, click Register new model to upload and store a new model release. Once you have all your models stored, simply select one or more models and click the images where the model(s) appear. Press Attach model releases to selected, and a tiny image next to the photo will show you that the model release has been attached.
Each time you photograph a model in a new session, you must supply a new model release. You cannot use one release for all time.
Repeat the process with any photos featuring other models.
Note that you can click the actual thumbnails, rather than the small check-boxes, to select images more quickly. If you make a mistake, just click on the tiny model images to remove the model release.
Property releases
If your photo includes the property of others such as houses or private buildings (interiors or exteriors), then we generally require you to include a signed Property Release form with your photo. You would add the Property Release by using Register new model as well. For fields which do not apply to Property Releases, choose “other” or “n/a”.
Submitting images for evaluation
Select the images that are ready to be submitted and click Submit selected. Submitted images will appear in the Pending section, awaiting review. Now you're done!
Editing or deleting images after submission
If you discover errors after submitting your images, you can still make corrections to your pending images. On the Pending tab, place a check under any image(s) you wish to move back and edit or delete. Click the Move back and edit selected button.
The image(s) will return to the Review & Submit stage. Here you can click Edit to alter image metadata, attach a model release if needed, or click Delete to remove the file.
Tip: If you wish to delete an image after it has been reviewed and approved, please email the request and image ID number to help@crestock.com Image Reviews
You will receive an “Evaluation Complete” message after your images have been reviewed. At that point, any approved images will be moved from the Pending tab into your portfolio. Any rejected images will appear under the Rejected tab next to Pending.
Troubleshooting upload issues
After processing is complete, you will receive an email which lists the files processed in a summary format. Files which completed processing will show as successful. If there is a problem with one of the files uploaded, you may see one or more of the following messages:
- AI removed as valid EPS file was provided or AI removed as valid zip file was provided or EPS removed as valid zip file was provided
These messages indicate that more than one version of a vector upload was provided. The system automatically selected the preferred file format and discarded the extra version(s).
- Companion JPEG is rejected as source vector is bad or Vector rejected as companion JPEG is corrupt or missing
These errors indicate that one of the two file parts needed for a vector upload was either corrupt or missing. Please check the portion noted as corrupt. If it works on your system, please try re-uploading both parts once more. (For more information about uploading vectors, please see our Technical Requirements.)
- File is 0 bytes
A 0kb file may be corrupt or might not have transferred properly. Please check the original file on your system. If it has a size and opens with no errors, try uploading it again.
- File name does not follow acceptable naming conventions
Please ensure that file names do not contain special symbols such as “+” or “&”, accent marks, or characters from other languages. Please rename the file to remove any such characters, then try uploading the files again. Note: Standard Roman alphanumerics are supported, as well as hyphens, underscores, periods and parentheses.
- Image does not meet minimum size requirement of 6.3 Megapixels
The minimum file size requirement is 6.3 Megapixels, or 6,300,000 pixels. Please upload a larger version of the file, if available, or see the Technical Requirements. for more details. Note: we do not accept photos that have been scaled up beyond the native camera resolution.
Tip: to determine the total size of an image, multiply its height and width in pixels. (For example: 2050 x 3080 pixels = 6,314,000 pixels total, or 6.3 megapixels.)
- Image is not the expected file type
This message indicates that a file with an unsupported format has been uploaded. Please note that the only supported file types are .JPG (or .JPEG), .AI, .EPS and .ZIP. Other file types (for example .NEF, .PDF, .PSD, .TIFF, and .HTML) are automatically discarded.
- Image must have three channels and/or Image must be RGB, not [CMYK/Grey/Other]
Please note that we can only accept .JPG images which are in an RGB (three channel) format.
- No files found within the archive or Zip archive is empty
The zip file which should contain the vector (.eps or .ai) is empty. Please re-zip the vector portion of the file and try uploading it together with the .jpg once more.
- No vectors found within the archive
The zip file should contain one vector file in either .eps or .ai format. Please re-zip the vector portion of the file and try uploading it together with the .jpg once more.
- Unexpected error
There are a number of possible causes. Please contact Crestock Support via help@crestock.com with details about when this error occurs.
- Zip contents too large
The contents of the zip folder noted exceed the available transfer limits. Please reduce the file size being transferred and try again.
Removal of files
- Files which cannot be processed for any of the above reasons are automatically discarded.
- Files which are uploaded but not submitted within 60 days are automatically removed.
- When uploading via FTP, please note that files must be copied directly into your FTP upload folder in order to be processed. Subfolders or subdirectories and their contents will be automatically discarded.
If you encounter any difficulties not listed here, please contact help@crestock.com
Main FAQ »
Artist FAQ » Upload Guide