Design Tutorial: Creating a Propaganda Poster

Posted Wednesday, 10 December 2008 by David Sykes in Photoshop, Design
In the second installment of our "how to" series, based on entries to the Crestock Photoshop Contest 2008, David Sykes shows us how he brought together the photographic source materials provided in Adobe Illustrator to create his winning design for Round 1.
The same end result could undoubtedly have been achieved using Photoshop alone, but Illustrator offers greater speed and precision for this particular style of design.

Step 1

Research, Research, Research. The more you know about the topic you are going to design around, the EASIER it will be for you to do something GREAT.

In this case the topic was propaganda and our assignment (as I understood it) was to aesthetically replicate the propaganda posters or their style and put our unique twist to the work.

Crestock.com has a wealth of information on this topic right there on the site - you can find links to this at the bottom of this post. There's a plethora of visual references which can basically guide you in a the right direction.

In studying the information on Crestock.com and from other sites (such as Google), what I have learned about the propaganda aesthetic is that it is BOLD, DYNAMIC and SIMPLE (predominantly). And now-a-days we can add CONTROVERSIAL to that list.

BOLD
DYNAMIC
SIMPLE
After you have gathered all your information and visual design aids/inspiration and have allowed the information to marinade in you mind, the next step is execution. (YAAAAAY !!!)

Step 2

Find some kind of textured background. I chose an envelope, because I enjoy the authentic feeling it will give to the piece.

Step 2.5


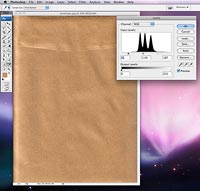
I adjusted the lighting on the envelope in Photoshop by using LEVELS (Command L) and moving the leavers at the opposite ends of the dialog box (the black one on the left, the white one on the right and the gray one in the middle) along the LEVELS scale until I got a very detailed and vivid envelope. This should make the work pop.

Step 3


I then work out my layout. Layout, as I see it, is the back bone of dynamic design.

I work out a grid system in Adobe Illustrator, and I usually do this in my head, but this is what it looks like. I do this because dynamism gives the work a really interesting feel.

* Dynamic - Usually attributed to works having a DIAGONAL THRUST.

Step 4


I cut out the pics in Photoshop using the pen tool. Next I work out how and where to layout the elements in the design.

I shift around the elements until I am satisfied with what I see. And you should too.

Step 5

The poster has a screen printed feel, which means that the colors are predominantly flat. One of the best ways to get solid tones is to use the "LIVE TRACE" feature in Adobe Illustrator. After you click on the picture, your tool bar at the top of the page should give you the "LIVE TRACE" option. Click on "LIVE TRACE".


After your image has been traced, click "EXPAND" and your image should glow with blue anchor points. Our goal is to use just the black areas. You then use the magic wand from your tools palette to highlight the white areas (or any area with the same color), then push delete on your keyboard to get rid of the white areas.

Then click on the black remains, the color area on your tools palette should display only black. Now your image is ready to be used. Repeat the same process with all the other elements you intend to use in you design.


Step 6

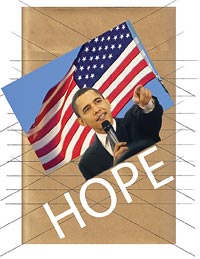
I don’t want the flag stripes to be showing through Mr. Obama’s face, so I use the PEN TOOL and draw along the edge of his image the shape of his silhouette. Then fill it with a color to match the background. This is done to make Mr. Obama appear to be in front of the flag.


Step 7


Now you can begin to layout the thing with the textured background, the guiding lines and the LIVE TRACED images.

When you add your copy, everything will start coming together. The typeface I used is Rockwell (Extra Bold). I chose it because of its obvious boldness and because of the serifs, that add even more power to an already powerful font.


Step 8


You can now add the secondary and tertiary backgrounds. This will make your work pop even more by adding some depth.

One background for the images and another for the type. Notice how the background for the type is following the construction lines.

And I am now adding more elements to the background (see the hands high in celebration)

Step 8.5

Another bit of background info is how to outline the main figure. This will put him more in the forefront of the piece. You can do this by duplicating the inner brown shape of the figure by holding "alt" and dragging the shape from the main poster.

Next, go to Object > Path > Offset Path. Set the offset to 4pt or whatever width outline you would prefer around your figure, when you are satisfied click "ok".

You should have something that looks like below; a wider shape around the first shape. Use the inner shape as a guide to re-align the new shape onto the main figure.


Step 9


All you do from here is pretty simple. Just add some more elements to complete the design and remove the construction lines to see the piece better.

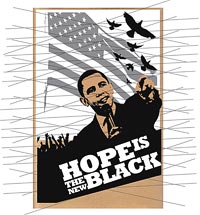
Depending on the topic of the work, your iconography choices should be in keeping with that theme. Mine are HOPE and FREEDOM, so I used the American flag, birds, stars etc. Simple, I know, but simplicity is sophistication.

Step 10


I now add a range of borders with different degrees of thickness to the work to give it a "structured" feel. you can do this by selecting the rectangle tool from the your tools palette. Then simply draw a rectangle around the edges of the first back ground (The envelope) and another on the inner edges of the work itself.

Then go to the "stroke" palette on your right, click on each of the rectangles and make the stroke as thick or as thin as you would like.

It is a very cool thing though, to break these lines of containment however you feel. I used the main figure to give it more prominence.

Step 10.5


One of the final things you can add to give your piece some more authenticity, is distressing. Distressing is usually used to make things look and feel old. I already had this distress filter/vector in my arsenal, I really don’t know how it got there, but I am glad I got it.

Step 11

The last step and most fun is adding the color. You can use the magic wand to select all the equal colors and add whatever color you want to the piece to make even better.


The final result:


David Sykes
About David: "I am a young graphic designer from Portmore, Jamaica who is eager to learn all I can about design, so I can continue to have more outstanding ideas, an effective arsenal of execution techniques and the mental fortitude come up with original ones. The community I live in is called Hellshire Heights, and I work for the advertising agency Ritch and Associates Ltd."
Weekly Free Stock Photo The Weekly Free Stock Image
We are giving away a free, high quality photo every week! Get Your Image

Comments:

Fantastic
By Darryl on Wednesday, 10 December 2008 5:15 PM
This is one of the best, and most original posters I've seen in a long time.
What he said
By Jinky Williams on Wednesday, 10 December 2008 5:55 PM
Great tutorial, man. I'm happy to have Stumbled upon it.
By VeryCherry on Wednesday, 10 December 2008 6:36 PM
Hey! Yeah, thanks for this tutorial. Very informative :) I aswell am glad that I stumbled upon it :) Good Stuff!!
OMG
By The One on Wednesday, 10 December 2008 6:48 PM
Socialism is the new black. Wake up people. Buy guns and be prepared to use them.
interessting, but...
By Tim Büthe on Wednesday, 10 December 2008 7:02 PM
Hi,

your tutorial is interesting and the poster looks great, but do you think it's a good idea to create an Obama poster using a hitler template? Maybe you should write a kind of a disclaimer... or am I to "over sensitive"?

cheers,
Tim
EggNogAdam
By EggNogAdam on Wednesday, 10 December 2008 7:41 PM
Awesome! Obama rules and so does this poster!
By ssjothun on Wednesday, 10 December 2008 8:24 PM
Tim Büthe, the reason why David, the author, refers to the Nazi propaganda posters is because of a blog post series with propaganda poster design history we've been running here at Crestock; US, Soviet and German so far.

Crestock is based out of Norway, and as you may know, we were occupied by Nazi Germany for 5 long years - so rest assured, we're far from crazy about the Nazi regime. However, their propaganda was brilliant and well worth investigating.

Thanks,

Sverre Sjøthun
Citizen
By Peter on Wednesday, 10 December 2008 8:32 PM
These kinds of posters are empty of both information content and artistic merit. "Hope is the new black" is taking a tired cliche ("x is the new black", meaning x is good) and then trying to make it memorable using very weak humour - is it meant to be funny because Obama is black? But if you just said hope is a good thing it would expose the fact that there is nothing to read here.

Exactly what concept is being conveyed here? Obama gives you hope? So what, the world needs more than hope, it needs real solutions to real problems. But those are too hard to talk about on a poster, which can't possibly go into more details than one sound bite. It's the visual equivalent of shouting at a mob.

Propaganda posters are annoying at best, and dangerous at worst. For you to encourage others to create more of them is stupid.
About the work
By wikiJ on Wednesday, 10 December 2008 10:48 PM
Cool work with nice clean technique. People who are arguing over the morel/social merit of the poster are posting on the wrong thread. You can use this system to say whatever YOU want. Keep in mind that your ideas about humor and/or politics are not necessary. Some of us want to learn and none of us care about your politics/religious beliefs etc.
Thanks for the lesson.
style points
Creating a Propaganda Poster
By Added by a PAL to FAQ PAL on Thursday, 11 December 2008 1:19 AM
David Sykes shows us how he brought together the photographic source materials provided in Adobe Illustrator to create his winning design for Round 1.
hanoi tay
By Steve C on Thursday, 11 December 2008 10:53 AM
great design, i love working with the communist propaganda here.
How about Jamaican politicians any of them inspiring?
I Can Buy It Where?
By Corey on Thursday, 11 December 2008 12:32 PM
Very cool - where do I buy it???
By henry cullen on Thursday, 11 December 2008 12:52 PM
great tutorial
thanks
Doom
By DM on Thursday, 11 December 2008 1:37 PM
I think I like this design technically.. Really good work! As far as this technical thing goes.

As for value and meaning (associations too) I cannot say anything good. Yes, media can be shocking, having some hidden connections with this ant that, but obama-propaganda-american flag in background mix.. At the very least I can say it looks offensive, and offensive in the bad way. It would be same if title say "America is the new Germany".
Nice
By Dean J on Thursday, 11 December 2008 2:23 PM
Lovely job David, keep it up.
Steve C.. The only thing our Jamaican Politicians seem to inspire is despair, and because of our political system we cannot kick out the jackasses when they do not perform.
we copy a lot of things from the Americans, mostly the negative attitudes, let's hope we can copy the positive now that "THE BLACK MAN" no longer have an excuse for not striving for a positive attitude
Detailed
By DLWSS on Thursday, 11 December 2008 2:35 PM
A very detailed explanation of "how it was done" by the designer. This tutorial contributes to this body of work and will assist in empowering others to be able to use snippets of it or the entire tutorial in advancing their work. Great work David. Congratulations!!
Sound bites
By Charlie on Thursday, 11 December 2008 9:02 PM
At first I wasn't sure I would bookmark this tutorial. After reading the comments, it's definitely a keeper. I will keep it not only for the technical merit of the work, and the excellent detail of the tutorial, I will also keep it because of the power it shows. Posters are meant to arouse our feeling and emotions with little "sound bites" that stick in our head. Good or bad, it is apparent from the feedback on the posters content, that this one has accomplished that mission.
Great Stuff
By w00dy on Thursday, 11 December 2008 9:13 PM
Bad Concept!
Love it
By heather on Friday, 12 December 2008 3:05 AM
Great tutorial
hopes is freedom
By harindra on Friday, 12 December 2008 5:09 AM
gre.a.a.a.t job man
ur tutorials was like tutor
the poster was marvelous
david, keep it up...
Nice Work
By Vipin Nair on Friday, 12 December 2008 6:58 AM
Dear David
We are a graphic design studio based in India and we do some decent work for corporates here. We like what you have done here. We would like to be touch and share ideas. You can mail to us at vipin@nairandarya.com & geetika@nairandarya.com. You could visit our website to know more about us. Hope we can be in touch.
Cheers
Vipin
Great work
By Si on Friday, 12 December 2008 8:36 AM
Dont listen to the critique here, some people take it waaay to seriously. This is not a political debate its a great tutorial on how to make a very effective design. Aesthetically its a wonderful graphic, both eye catching and brilliantly conceptualized. You have a great talent :)
Very well done
By RubenB on Friday, 12 December 2008 3:02 PM
When I first saw the finalist, my eye was immediately drawn to this poster. Big props to you and your strategies...keep on designin'!
By K on Sunday, 14 December 2008 9:32 PM
@Peter: Jesus Christ, just focus on the artistic merit will ya? It's a good tutorial, so stop being a butt.
Great tutorial
By yojay on Sunday, 14 December 2008 10:46 PM
I learned a TON with this tutorial! I was specifically looking for exactly this. I think anyone who is looking at a tutorial about propaganda posters and then lamenting the results needs to understand the difference. If you're here to try to prevent propaganda posters from ever appearing again in the future, even in humor or as art, well good luck with that.
Out of this world tutorial
By Linda Carpenter on Tuesday, 16 December 2008 3:30 PM
Straight to the point, founded in traditional approach, exceptional in every way.
Nicely Done
By Ronald on Wednesday, 17 December 2008 8:56 PM
This looks great David--very professional!
By foo on Thursday, 18 December 2008 5:29 AM
Yay, Obama the messiah propaganda! The second coming of Jesus is here! All hail Obama!
Thanks for Sharing
By Print Posters on Friday, 19 December 2008 8:58 PM
I don’t see why people are commenting on the content of the poster, rather the design, which is obviously what this tut is about. I love the half steps (8.5, 10.5) – great! I like the distressed look, too, and I’m interested enough in looking for the distressed filter. That is definitely a key design element for the propaganda look.
By Grace on Thursday, 25 December 2008 11:15 PM
While I love the poster, and humbly recognize the awesomeness of your Adobe skills, I must say, the combination of the flag pulling inwards from the frame and Obama's elbow poking out of it gives the whole thing a bit of a lopsided feel...
Keep up the great work!
well done odd message
By Site O Rific on Monday, 29 December 2008 8:44 PM
Well I guess it is a propaganda poster, so what better way to get across the lame notion that Barak is not black enough! Maybe you were kidding and I'm too white to get it? It is clever non the less and well executed.

Add your comment:

Further comments have been disabled on this post.